The idea behind this program is to share real world data with others. This could be temperature, radio signal strength, seismographic data, just about any physical parameter which fluctuates over time. In order to do this, the continuously changing physical parameter must be converted into a series of measurements. The Data Source options page contains the settings needed to allow these measurements. See this FAQ to answer the age old question of what the Y axis represents.
Note that the data source configuration changed radically in version 1.2.11 of Radio-SkyPipe. If you have an older version , your panel will not look like the one above.
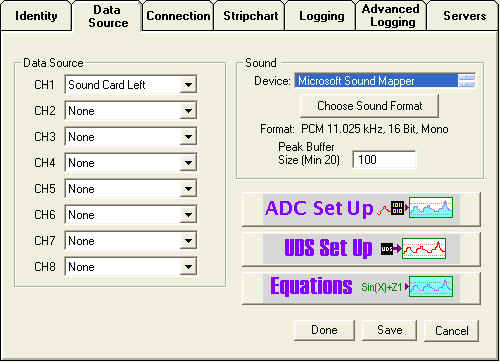
If you have the standard version of Radio-SkyPipe, only the top (CH 1) data source drop down box will be active. You will be able to select from right or left audio channels, and MAX 186 or MAX 187 ADCs as your data source. Pro version users will also be able to select from UDS and Equation data sources.
Important! When more than one channel is desired, select data sources for consecutive channels starting with channel 1. The first occurrence of a None selection in the list will stop the program from searching for additional data sources and will ultimately determine how many channels you are charting.
Sound Cards as a Data Source
The sound card has the ability to make this conversion to signals which are input to it through the line input or microphone jack, but it only works with rapidly vibrating signals like sounds. If you want to sample sound volume, the sound card is a good option as most PCs have one and there is nothing else to build or buy.
R-SP Standard Edition users may use only one channel of the sound card for data collection and serving. Pro Edition users can take advantage of both channels and input a different sound signal to each channel. This might be used, for example, to display the audio outputs of two receivers set several megahertz apart in frequency. Right and left channels are selected in the Channel Source drop down box.
Configuring for Sound Card Operation
Select Sound Card in the Data Source box. Standard
Edition users may only select the 1(Ch) option. Select a default sound device
listed in the Device box. This option was added in version 1.4 to allow
selection of a given card when more than one device is available. The
Microsoft Sound Mapper option is often seen and will also work in most
situations. You must then select the sound
format which includes the sampling rate, mono vs. stereo, etc. This is done via
the dialog box obtained by pressing the Choose Sound Format button.
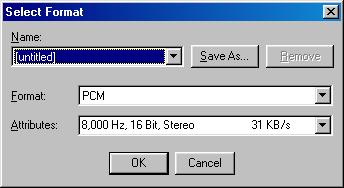
The Select Format screen allows you to choose from the registered sound formats on your computer. However, not every format will work for you. For most purposes it is suggested you select PCM format. In the Attributes selection list you will find a variety sampling rates 16 bit vs. 8 bit, and stereo/mono options. Radio-SkyPipe is designed to work with 16 bit sound cards so never select 8 bit. Higher sampling rates are used for high fidelity recordings and are generally not needed. Higher sampling rates can degrade the performance of R-SP and take much more drive space when being saved as sound files. The suggested rates are 8000 and 11025 Hz. Use stereo when using 2 channel sound data collection (Pro Edition users only). In addition to the effects that choosing the appropriate sound format has on data collection, the selected format will be used for recording wav files (Pro Edition only).
You may give your sound format selection a readily identifiable name (such as "SkyPipe Format"), and save it so that it will appear in the "Name:" drop-down list for easy selection.
Peak Buffer Size - When the program samples the audio signal passing through the sound card, it does so in little chunks. These groupings of sound card readings are in kept in a Peak Buffer. When the Peak Buffer is full, it tells the program to "read me!", and the average value of the samples in the Peak Buffer is saved as a single data point on the stripchart. What this means to the observer is that you can adjust the coarseness of the audio sampling. The best way to handle this adjustment is through experimentation. If the Peak Buffer Size is too large, you will not be able to use an rapid sampling rate. The suggested Peak Buffer Size for most uses is 100 to 1000.
Note that in order for SkyPipe to be able to chart sound the sound source has to be selected in the mixer panel of Windows.
Analog to Digital Converters as a Data Source
Other types of measurements can usually be converted to a voltage and that voltage can be read by an analog to digital converter (ADC). There are hundreds of these devices available and no data collection program can use them all. For starters, I have decided to support just two ADCs with Radio-SkyPipe. These devices are inexpensive and simple to build. (We may offer a kit at some point if the demand warrants). We have plenty of documentation on how to build the MAX187 ADC, the single channel unit, right here on our website. The MAX187 ADC connects to your printer port.
You may also use the first channel of a MAX186 8 channel, 12 bit ADC with the Standard Edition of R-SP. Pro Edition users may use all 8 channels for data collection and serving data. The 8 channel ADC may be purchased from Radio-Sky or you can build the unit from a kit. We also offer just the MAX186 ADC IC . As with the single channel unit, there are plans for constructing the 8 channel ADC on this website .
You may select either the MAX187 single channel unit or the channel MAX186 ADC. Pro Edition users may use any subset of the 8 channels available from the MAX186 ADC. You cannot use both a MAX187 and a MAX186 ADC at the same time. There is no provision for doing this even if you have multiple parallel ports.
Configure the ADC by pressing the large ADC Setup button. The following screen appears:
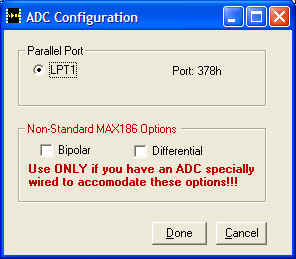
Select the parallel port to which the ADC is connected. If you get a "Printer Port Not Found" error see Troubleshooting for how to manually install the printer port driver. The Non-Standard Max 186 Options are available only for specially wired MAX186 ADC boards. Click Done when you are finished.
The SkyPipe UDS Model opens the possibility for a wide array of devices to act as data sources for the program. This is a Pro Version feature only. Select the User Defined radio button. Press the UDS Set Up button to configure the connection with the the UDS.
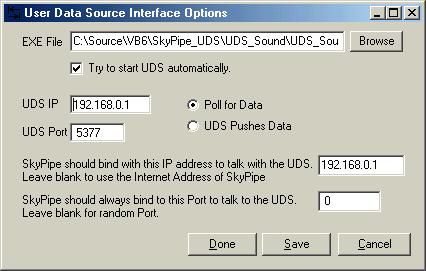
Browse for the UDS executable file that will act as the data source or enter the file name and path manually. Select Try to start UDS automatically if that is what you want to happen. If the UDS executable occurs on another PC and will be accessed via a network, it may not be possible to start the UDS program remotely and other arrangements for starting it may be necessary. All UDS programs communicate with R-SP via a TCP connection and TCP must be installed on your PC to use a UDS even if the UDS occurs on the same PC as R-SP. Select Poll or Push data depending on your preference (see the UDS model documentation for an explanation). Local TCP and remote TCP parameters should be entered.
Pro users may also use the result of an equation as a data source. You may select from the 8 possible equations you have written using the data source drop down box. Because equations may refer data in other channels, it is not necessary that the channel have any other source of external data. For example, your channel 3 data source could be an equation that multiplies the data from channels 1 and 2. To go to the Equation Set Up panel press the Equations button on the lower right to reach the panel where you may write and apply equations.
Configuring for the Printer Port for ADC Operation
Printer ports are automatically detected by the program. If you have more than
one printer port on your PC and are using a printer port attached ADC, you must
select the printer port that the ADC is connected to.
Clicking Save makes your selections the defaults for the next time you start the program.
Clicking Done simple changes the settings for the session you are in.
Clicking Cancel discards any changes and takes you back to the main screen.