In Client Mode you can receive in real-time strip charts being generated by anyone connected to the internet or your local LAN. Of course, that strip chart must be made available by another R-SP user who is in server mode. Using the Second Client Mode Chart feature, you may even exchange strip charts simultaneously.
You enter Client Mode by selecting Mode / Client from the menu at the top of the screen.
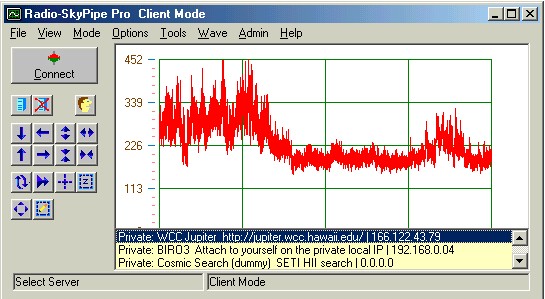
On your screen will appear a list of available stripchart servers. If
you have selected Check for Servers Online in your Connection
Options, the list shown will be those servers which have published
themselves on our ILS so that others can connect to them. Your Private Servers
List will appear below any published servers. The Show Servers ![]() and Hide Servers
and Hide Servers ![]() buttons control the
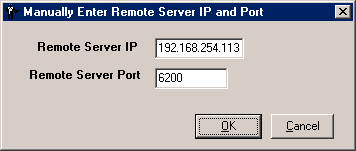
display of this list. You can also manually enter an IP and Port number by
right clicking on the available chart servers list and selecting Manually Enter
IP and Port which will bring up the dialog box below:
buttons control the
display of this list. You can also manually enter an IP and Port number by
right clicking on the available chart servers list and selecting Manually Enter
IP and Port which will bring up the dialog box below:
Usually however you will simply begin receiving the strip chart by clicking on the server entry in the available servers box so that it is highlighted and then click the Connect Button, or by just double-clicking on the entry. To end the session click the Disconnect button.
That's all there is to it! You will be prompted to save the strip chart in accordance with you Logging Options selections.
Note that even though you are restricted to collecting data locally to a single channel when using the Standard Edition of Radio-SkyPipe, there is no such restriction on how many channels of data you may receive from a single remote server!
When you connect to a server a information screen appears containing the identity information from the server.
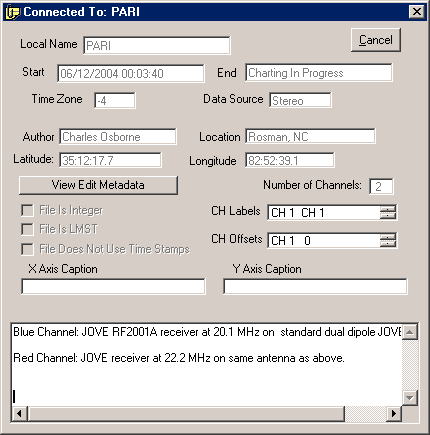
This screen may be dispensed of by clicking the Cancel button. All of the information is still contained in the data file should you choose to save it.