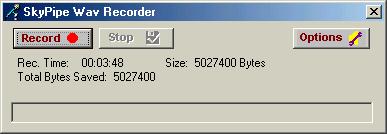
When collecting audio derived data via the sound card, it is sometimes desirable to capture the sound into a file so that it may be played back and listened to. To initiate the Wav Recorder panel select Wave / Wave Recorder from the main menu options across the top of the main SkyPipe window.
In versions 1.2.8 and above wav file recording can be triggered in three ways:
Most of the options associated with the wav recorder have to deal with these recording methods. To set the options for the wav recorder click the Options button on the wav recorder panel.
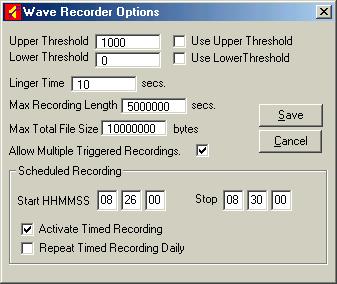
Thresholds
Set this value to level which you thing signals a significant audio event.
For example, your chart may be riding along smoothly at a level of say 1000 and
you believe that a significant solar burst would push the chart above
1200. You would set the Upper Threshold to somewhere around the 1200
level. When a burst did occur above that level the sound would be captured
in a wav file. In order to prevent false starts based upon transient
noise, the program will usually ignore them. There is a compromise being made by
the program in sensitivity to short events because of this. Lower threshold
triggered recordings work in the same way but are triggered when the chart value
dips below the Lower Threshold level. To activate either form of
threshold triggering you must check the checkbox associate with it.
Linger Time
Set linger time to let the program know how long to wait before ending the
recording after the threshold is no longer being reached by the signal.
This prevents the recording from immediately dropping out when there is a brief
dip in the signal level.
Wav file recordings are fast and take up less of your computers CPU time than many other formats which use complex compression schemes. That is why we use the wav format in this program. The downside is that wav files also take up a lot of room on your hard drive. To prevent a continuous recording from accidentally eating up vast amounts of disk space (especially when unattended), I have included a couple of safeguard settings that limit the recording length of an individual file and of the total size of all wav files saved since the Wav Recorder was opened. It is up to you to decide what these limits should be. Max Recording Length sets the limit of an individual file in seconds. Max Total File Size sets a limit on the total amount of disk space which is allowed to be consumed before the Wav Player refuses to record any more. When Max Total File Size is reached the Wav Recorder stops the recording and requires you to close the Wav Recorder and re-open it (not the entire program, just the recorder) before it will allow continued recording. Restarting the recorder resets the totals it has been keeping and starts anew under the same limits you had set.
Allow Multiple Triggered Recordings does just what it says. If you have this unchecked then the recorder goes into its locked state after a single threshold triggered recording has been made.
Wav recording can be based on a preset time. Enter the the time you would like the recording to begin and end. The time you input should correspond to your choice of Universal Time or local Time for chart recording. There is presently no provision for basing recording time on sidereal time. If you would like the recording to occur at the same time every day, you can select the Repeat Timed Recording Daily box. To make the scheduled recording option active, you must have the Activate Timed Recording box selected. When you close the options panel, you will see any pending start or stop of a scheduled wav recording in the status bar of the wav recorder panel.
Use the Save button to save the options you have set so that they will be applied and automatically retrieved the next time you start the recorder.
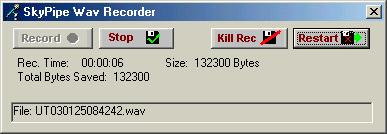
To begin recording a wav file, press record. There are three options for stopping the recording:
The Options button is not visible while you are recording. You must
stop recording to change options.
Related Topics:
Associating a wav file with a chart.